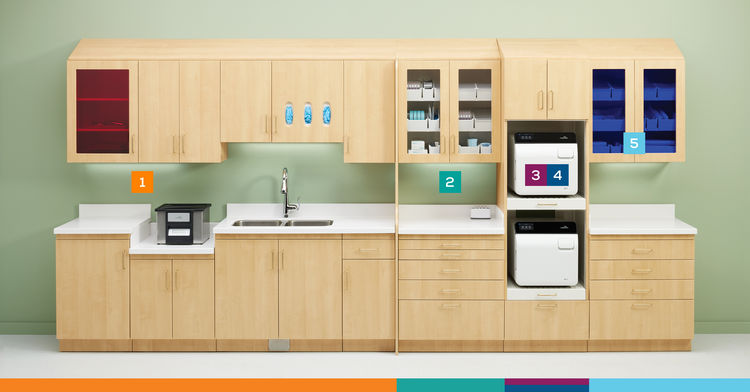
Even with a designated area for instrument processing, there’s a chance the workflow design may not be compliant. Regardless of the size and shape of the area, we can help.
5-Step Instrument Processing Workflow
There are more than 680,000 infections and billions of dollars in excess healthcare costs related to healthcare-associated infections across the United States every year. These types of infections can have devastating health and financial implications—worse, they can be deadly. A better understanding of facility, equipment and workflow design can play a central role in easing this burden.
The standardized Midmark instrument processing (IP) workflow aligns with The US Centers for Disease Control and Prevention (CDC) recommendations and incorporates best practices from The Association for the Advancement of Medical Instrumentation (AAMI) and the Facility Guidelines Institute (FGI).
Instrument processing is a critical part of any infection prevention protocol—and even with a designated area for instrument processing, there’s a chance the workflow design may not be compliant. Regardless of the size and shape of the area, it’s important to follow a dirty-to clean IP workflow as recommended by the CDC to help contain contamination and maximize the efficiency of the instrument cleaning and sterilizing process.
Step 1: Receiving + Cleaning
Reusable instruments, supplies and equipment should be received, cleaned and disinfected in one section of the processing environment. It’s important to ensure that all instruments, supplies and equipment are thoroughly cleaned of organic debris prior to sterilization or sterilization will be ineffective.
Step 2: Preparation + Packaging
This area should contain a sink where the cleaned instruments and other supplies can be rinsed and then dried thoroughly. After cleaning, instruments should be rinsed and dried thoroughly. Cleaned, dried instruments and other supplies should be inspected for residual debris and damage, assembled into sets or trays, and wrapped or packaged for sterilization.
Step 3: Sterilization
The sterilization area should include the sterilizer and related supplies with adequate space for loading and unloading the sterilizer. Thought should be given to the size and the type of sterilizer(s) that will need to fit into the configuration of the instrument processing space.
Step 4: Monitoring/Sterility Assurance
This area needs to be configured to support the documentation and recording of mechanical, chemical and/or biological monitoring utilized to help ensure the efficacy of the sterilization process. These records must be stored and accessible for a certain period of time as required by local, state and federal regulations.
Step 5: Storage
The storage area should be adequately sized, closed or covered, and located apart from contaminated instruments in an area protected from moisture. Supplies and instruments should not be stored under the sink. If a sterilized package becomes wet, the contents will need to be reprocessed before they can be used.
Midmark IP solutions were designed around best practices to help make regulatory compliance to clinical standards as easy (and as automated) as possible. When Midmark design consultation experts work directly with project architects, contractors and interior designers, we can help ensure facility design and room configurations align with equipment, workflow, compliance and intended outcomes.


